AMPLAN Users Guide

The parts tracking module is used to track removal and installation of all serialized components in the fleet. Here you can create new components in the database, assign them component maintenance tasks and print component life records.
Figure 2.5. Parts tracking module
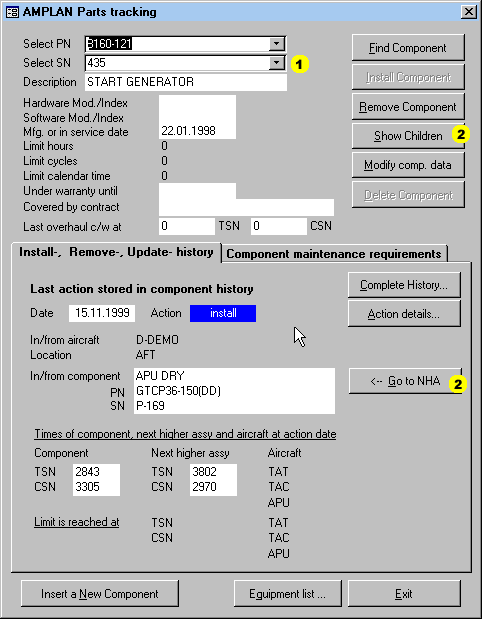
 | The SN box contains only the SN's belonging to the above selected PN. |
 | Use these buttons to jump between child and parent components. |
In the basic version of AMPLAN you can do only three types of action with a component:
INSTALL, install the component in an aircraft or into another component.
REMOVE, remove the component from the aircraft or component it is installed in.
UPDATE, update the component data manually.
When you install or remove a component which has sub-components installed, all the sub-components together with their attached maintenance requirements will be installed or removed as well.
Click the "Insert new component" button and this dialog will appear.
Figure 2.6. Insert a new component
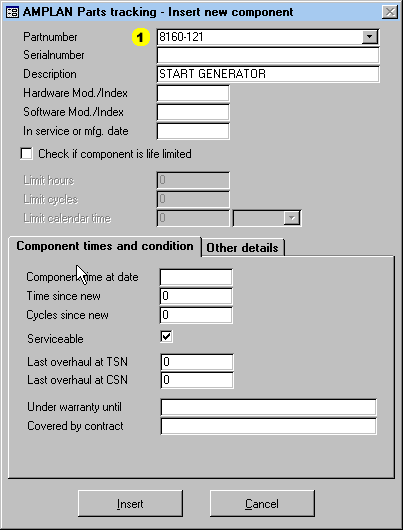
| After you select or enter a PN here, and if this PN does already exist in the system, the description and possibly life limits will be filled automatically with the values from the already stored component. |
The field "Component time at date" must be filled. The In service or manufacturing date is a must if component tasks, CMR's, based on calendar time will be linked to the component.
You may set all three possible life limit parameters at the same time, the system will evaluate them for whatever is due first in the planning module.
Example 2.1. More than one life limit parameter
When you put in 5000 Hours, 4000 Cycles and 3 Years, then you read it like this:
The limit is reached at either 5000 FH or 4000 landings or 3 Years whatever comes
first depending on the utilization of the aircraft.
The last overhaul at TSN/CSN fields should be filled if you want to see the TSO and CSO in the equipment listings. They default to 0 if no overhaul has been carried out yet.
After the data is filled in , click "Insert" and the component is put into the database. The only history record for this component at this point will be an "Update" action with the data you just supplied. The next step is to install it into an aircraft or into another component.
By clicking "Install Component" on the parts tracking form, the following dialog will appear.
Figure 2.7. Install a component
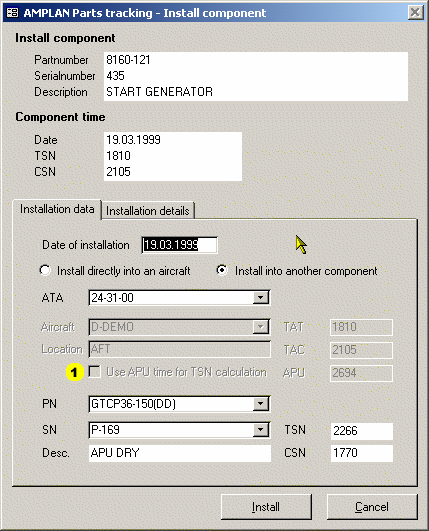
| If you want the component TSN to be calculated based on APU operating hours instead of aircraft hours, check this box. If one of the parent components has this set, the TSN calculation for all its child components is automatically based on APU operating time. Therefore this feature is not required for installation into other components. |
After you have entered the install date, you have the choice to install directly into an aircraft or into another component which is stored in the database already.
![[Note]](images/note.gif) | Note |
|---|---|
The component you are installing into may itself be a child of another component. This allows to build assemblies in tree like structures of components where, when e.g. the top level component is installed or removed from an aircraft, all childs are also being installed or removed. | |
Next step is to enter the appropriate ATA chapter and then select either the aircraft you want to install into or the component you want to install into.
The hour and cycle information of the aircraft and/or NHA for the date of installation will be calculated automatically and put in to the respective fields.
On the tab "Installation details" you can enter workorder-, certificate references and a note in case you want to.
Click on "Install" and the component is installed with it's complete previous history, correctly calculated TSN/CSN and all of it's assigned maintenance tasks.
Example 2.2. Part installation consequences
If the installed component is life limited, installed into another component and
this parent component into an aircraft, then the component will appear in the
planning module with it's assigned maintenance tasks and the life limit, whereby
the due date/time is shown in aircraft TAT and TAC.
The install action makes an entry in the component history. You can check or even modify certain fields of this record by clicking the "Complete history ..." button on the main form.
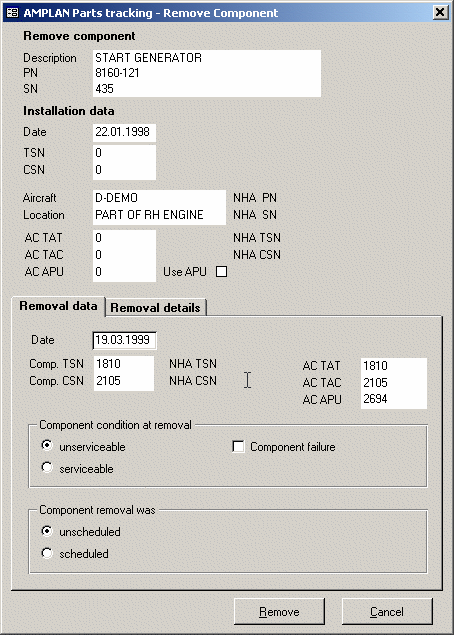
To remove a currently installed component click "Remove Component" on the parts tracking form. The following dialog will appear.
All you need to do here is to enter the removal date, since all the required data to calculate the TSN/CSN at removal is stored in the database already.
You may fill the rest of the fields as required and click on remove. This will add a "Remove" action to the component history with the details you have set here, but which you may alter any time later on.
You may alter component data anytime if you need to, e.g. because a life limit has been put on or has been removed, PN or SN was not entered properly in the system etc.. Click on "Modify comp. Data" and the following dialog will appear.
Figure 2.9. Modify component data
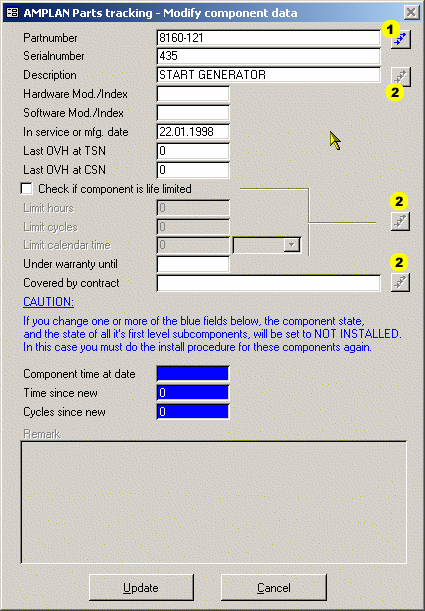
| Click here to apply a PN change to all components which have the same previous PN as well. |
| Apply changes to all components in the database having the same PN. |
| Note |
|---|---|
Changing anything but the blue fields does not lead to a new history record. | |
![[Warning]](images/warning.gif) | Warning |
|---|---|
Changing the component time manually makes is necessary to remove the component in case it is installed. First level child components will be removed also in this case. This is because child level component TSN/CSN is dependent on the parent time at installation. If the parent time is changed manually, there is no way to make sure the calculated parent TSN/CSN stored in the history record is still valid. For the component itself it is the same, there is no way to ensure the calculated history data is still valid. | |
Sometimes you may need to modify an action in the component history. E.g. a removal action if a component was removed to troubleshooting and the initial entry for the condition was "unscheduled" and "unserviceable". A few days later you may know for sure the component was not the reason for the trouble on the aircraft and you want to change the condition to "serviceable".
To do this, click on "Complete history" and the following dialog appears.
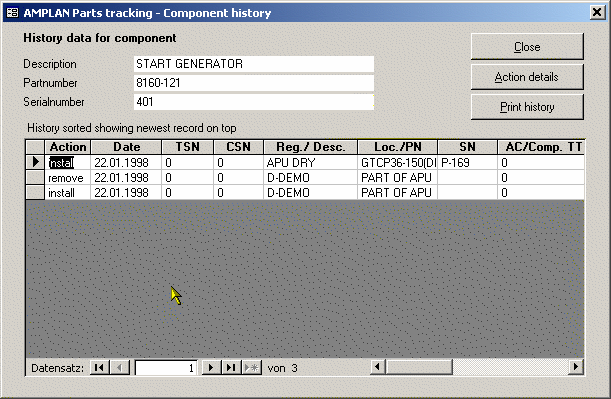
In the list move to the record you are interested in and click "Action Details". You will then see different dialogs in respect to the type of action where you can view and modify the detail data.
To print the history simply click "Print history".
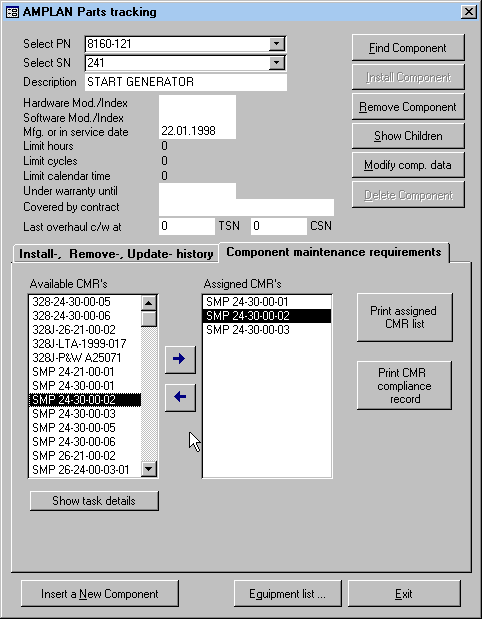
On the tab "Component maintenance requirements" of the parts tracking form you can assign CMR's analog to the out of phase tasks, OOPR's, in the aircraft module, see Section 2.1, “Aircraft module”, to the currently selected component.
You assign CMR tasks which are maintained in the CMR module to the currently selected component simply by selecting the CMR you want to assign in the left list, click the right arrow button, and you are done. The CMR will now appear in the right list of already assigned CMR tasks. To remove a CMR click the left arrow button.
| Note |
|---|---|
You may also assign CMR task from within the CMR module, see Section 2.6, “Component maintenance requirements 'CMR' module”. | |
To print the maintenance record for the component, click "Print CMR ...".